


Post-tensioned (PT) concrete has been used as a building system since the 1950s and is commonly selected for its versatility and structural efficiency. As a result, a significant percentage of the U.S. building inventory utilizes post-tensioned horizontal concrete floor framing (i.e., slab-on-ground and elevated floors in buildings and parking structures). Many owners and operators are unaware that their asset contains post-tensioned concrete structural framing, and a limited number are aware of the fine nuances that make this framing system unique from a stewardship and engineering perspective.
In this webinar, engineers Timothy Gregor, Ralf Leistikow, and Tracy Naso explain what post-tensioning systems are, review indicators that these systems are not performing as intended, and describe various approaches to maintain and repair them. This webinar aims to educate building owners, operators, developers, and others about special attributes of post-tensioned structures that need to be considered during construction, maintenance, and modifications.
By the end of the webinar, you will be able to:
- Identify basic components of a PT system and describe how age, detailing, and construction can impact durability
- Explain the significance of cracking, moisture penetration, and staining in PT reinforced concrete structures
- Evaluate common modifications to PT systems and ways to make the changes more efficient
- Determine if a concrete structure is likely reinforced using a PT system and develop next steps to investigate and maintain the post-tensioned structure
more to learn
View this webinar in our interactive audience console to earn 1 AIA HSW learning unit, access related resources, submit questions to the presenters, and download a certificate of completion.
Ralf Leistikow, Principal
Tracy Naso, Principal and Unit Manager
LIZ PIMPER
Hello everyone and welcome to today's WJE webinar. Why All the Stress About my Post-Tension Building? My name is Liz Pimper and I'll be your moderator. During the next hour, engineers Tim Gregor, Ralf Leistikow and Tracy Nassau will explain what post-tensioning systems are, review indicators that these systems are not performing as intended and describe various approaches to maintain and repair them. This presentation is copyrighted by Wiss, Janney, Elstner Associates and now I will turn it over to Tim to get us started. Tim.
TIM GREGOR
Thanks Liz. So today's presentation is Why All the Stress About my Post-Tension Building? So our learning objectives today are going to be to identify the basic components of a post-tensioned or PT system, to explain the significance of cracking or other signs of distress, and then to evaluate common modifications to PT systems and structures. And lastly, to determine if a concrete structure is likely PT and what do you do about it. So our outline for today will be to start with what is post-tension concrete, which will then lead into some of the impacts of construction and detailing on the PT system. Then what are signs of deterioration and distress in our structure? And lastly, modifications to existing PT structures.
So starting with what is post-tension concrete? The great definition of reinforced concrete that uses high-strength, pre-stressing steel embedded in the structure and the strands are tensioned after concrete has hardened. It's also commonly shortened to PT. You can see here an image of a PT structure and in the bottom left you've got an image of what that pre-stressing steel looks like.
So some of the benefits of PT systems. They allow you to reduce the amount of reinforcement in your structure so that leads to less congestion inside the concrete, which leads to the ability to stick more things in there like conduit. You can also decrease the amount of concrete cracking that the structure experiences, which can lead to a decrease in deflections. The PT system also allows you to decrease the thickness of your slabs and increase the span lengths of beams and slabs, which can lead to less congestion of columns in your structure.
Lastly, the more modern systems also lead to durability improvements with the fully encapsulated system, which I'll explain shortly. But why should I care about PT? I guess, I really care about PT, but why should you care about PT as well? So first, there is a large amount of force in each tendon, typically on the order of 27,000 to around 31,000 pounds in each tendon, and these tendons are unbonded for the full length of the tendon or the beam or the slab, and that means that you can have localized damage effects that have global implications.
Additionally, water can get into your PT system and lead to hidden deterioration, which means that you need to be more concerned about it. Additionally, older systems are also more susceptible to degeneration and I'll get into why in a little bit, and lastly, or second to lastly, PT systems require specialized knowledge to assess, repair, maintain or modify them. But lastly and most importantly, it's just really, really cool.
So getting into what are the system components of PT? The main one is the tendon and the tendon encompasses a couple of different parts and these are all embedded in the concrete. So firstly in the top right you've got your pre-stressing strand, which here is shown as seven wire strand that's coated with PT coating or grease. And that grease has, the more modern stuff has corrosion inhibiting properties, and that's encased in a either plastic tube or sheathing. The older systems, the sheathing was only intended to be a bond breaker between the strand and the concrete, allowing that strand to move within the concrete. In more modern systems that sheathing is intended as a moisture barrier.
Other components of that tendon are, as I mentioned, from left to right, the coating on the strand and the sheathing, which then leads to the sleeve between the end anchor and the sheathing in the more modern systems. And now looking at that end anchor in particular, the strand is attached to the end anchor through wedges and that end anchor is what transmits the force to the concrete. You can see in the bottom there a rendering of that end anchor inside the concrete and then to cap it all off if you will, there's an end cap or encapsulation cap that goes on the backside that adds another moisture barrier to the system.
So how does PT work? Well, typically in reinforced concrete shown on the left there, you've got reinforcing bars that are on the top or bottom of your member where the tension reinforcement is needed, but in PT structures, your tendon is often draped. You can see it shown on the right there where it moves up and down along the length of the member and those tendons are then pulled to put compression forces in your member. We're going to get a little fun animation here. So those tendons are pulled through, well, I guess the strand is pulled through the end anchor and we'll get a little close up picture of that. So as you're pulling that strand through your end anchor, it's imparting a opposite force on the concrete, which then puts a compressive force in there.
Another way to look at it overall, you've got your compression force in your member, which is shown by the big arrows and then your drape of the tendon imparts a vertical force, which Ralf will get into later on some of the implications of that along the length of the tendon. One important thing to realize about this is as you're trying to impart those compressive forces along the length of the member, the supports at the end of the structure need to be allowed to move a little bit so you can squeeze that concrete in the middle together. If your ends are too fixed or rigid, those ends are just going to suck up all that compressive force instead of compressing the middle part of the member.
Another way to look at it, we're showing a parking garage here where you've got your tendons and the beams shown with dotted lines and they go up and down along the length of it, generally higher at the columns and lower at the mid-span and then clamped together, if you will, on the structure at the end. Anchors, it's harder to see once everything is poured in place because the concrete obscures a good deal of the PT system.
Another component of it is the slab. So if you have a beam, you'll usually have distributed tendons and I'll get into those a little bit, but if you don't have beams in your system and it's just a full slab and column system, you'll have what we call distributed and banded tendons. The banded tendons shown here in the blue boxes are groups of closely spaced tendons, typically along the column lines. And then in the opposite direction you've got distributed tendons which are uniformly placed tendons going in a perpendicular direction and most importantly, you've got your end anchors which put your compressive force in the concrete and clamp the whole thing together.
Other uses of PT. On the left here you can see barrier cables which are intended to serve as a barrier for pedestrians and vehicles. On the right you can also have cantilever columns and we're not showing, but you can also typically use them for slab-on grounds for residential construction where the soils aren't the best.
So construction parties or parties involved in construction. You have for typical construction, your owner design team and then your construction team. For PT construction, you still have your architect EOR, your general contractor and then your subs. But for PT construction, you add in the PT supplier who's taking responsibility for the PT system. The engineer of record is going to provide structural drawings, which are going to call out general requirements for your PT, so a typical layout and specified forces where your PC supplier is going to give you shop drawings that lay out exactly where all the tendons are going and what they're getting stressed to. And lastly, you've got your testing agency that's performing QA QC for either the owner or the construction team and they're going to look at tendon placement and review stressing as well.
The construction sequence starts by placing your conventional bars and post-tensioning tendons in your concrete forms, which is then followed by placing the concrete in there and allowing it to cure and gain strength. Once you've got your strength in the concrete, but before you move your forms, you're going to get your stressing ram on there and start stressing your tendons through your end anchors at your exposed ends. Once you're pulling on those tendons, the tails are going to come out and elongate, shown here in the left image. After those are fully stressed, the wedges are then set to lock those tendons in place and then the tails are cut so that you can put the end cap on there. And then in the bottom right you can see where the end caps are in place and those holes will be filled with grout to provide another means of moisture barrier.
So how do I tell if I've got a PT structure? Well, the first place to look would be to look at your drawings. As I mentioned, the structural drawings are going to call out general requirements for your PT. So this one's showing an effective force per foot. If you've got a distributed system, this is what you're going to see. If you've got a banded system, it'll call out the effective force over a specific area. They will also give you the drape of the tendons. So here's calling them out in a series of ones and sevens for your high points and your low points. If you've got shot crines for your PT, that's also a dead giveaway that you have a PT structure.
Another one to look at is if you have exposed edges of your structure and you see these discolored circles if you will, on your structure edge, we box them here for your identification. The last two that can give away if you have a PT structure is if your beam or slab spans are fairly large, that's a good indicator that you've got a PT system. Lastly, if your structure was built after 1955, it may be PT. Before 1955, PT wasn't a common construction system and now I'll hand it over to Ralf who will take over some of the impacts of construction and detailing.
RALF LEISTIKOW
Thanks Tim. I want to go through and just review some of the things that could impact the performance of the post-tensioning system and some of that obviously being moisture contamination. And where it could start basically would be at the site during construction and it would be on-site storage, typically. You'd see those pictures on the right, one of them where the tendons are basically placed on no cribbing, on the bottom right, the blue tendon bundles are actually strapped with middle strapping that can cut into the post-tensioning sheathing and just basically compromising those layers and that encapsulation could allow moisture to enter the tendons and basically result in corrosion.
This for instance was during construction placement. Tim had shown you some overalls, but this was actually before the concrete got cast and you can see the blue sheathing up there and the blue arrows, you see the elliptis paper and you can see that actually there's moisture that has worked its way between the assemblies even before the concrete was cast, which is not an ideal condition and hopefully something like this would be caught during the QC QA period.
So what's the big deal about moisture? Well, moisture ingress can lead to corrosion and especially in PT that is pretty important. Over time, that corrosion can basically result in broken tendons. And I'm going to get into that a little bit more how that's different actually from conventional reinforcing, rebar as we know it. Rebar usually we talk about a loss in cross-section of 20% is not so problematic. Obviously you have to have an engineer look at it, but with post-tensioning you can have different type of corrosion and it's more like pitting. And so let me go into this. So this is an example of some of the phases we potentially see this is you can see the image of the cut sheathing with water coming out, which is not a good condition obviously. So that water has entered the sheathing and it's just sitting there and it eventually results in the breakdown and emulsification of the grease that's in there and you can see that cakey, sandy-looking material.
That eventually results in corrosion and that corrosion then will result in pitting in corrosion on the wires themselves. So we have seven wire, center wire running straight through and six bundled around it. That's your post-tensioning tendon. These, as Tim mentioned, are stress to 33 kips or 33,000 pounds. And typically actual forces after seeding and such is around 27,000 pounds. And it's high-strength steel, which is quite different from reinforcing bars. And therefore just wanted to show you this is pitting corrosion what we're talking about, the green up there is a strand that's in good conditions and on the right you'll see the cross-section of the wire, the edge of it and it's in pristine condition, whereas when you start seeing pitting and the picture there on the bottom is you see the pitting corrosion on the wires and you can kind of see those notches which introduce stress risers and could basically result in a wire break.
And then eventually multiple wires will lead into failing the entire strand and tendon and loss of capacity. And sometimes we talk about signs, sometimes those signs can be explosive. You'll get a blowout, those kinds of things. I'll mention that a little bit later. You'll maybe get some less damaging impacts as far as just visual impacts. We'll discuss that as well. But sometimes there's no signs and you don't get any real signs until you have significant loss of post-tensioning force or multiple tendons have failed. I have these pictures on the right, an example of a slab we looked at and you look at the end anchors here. This is non-encapsulated, an older system that doesn't have the grease caps here at the end at the top view and you can see down the strand, you can see the corrosion and the bottom picture basically shows what we found and inboard of the anchorage you basically have complete failure of the wires and loss of post-tensioning, but when you look at the end anchors, there's really no sign that there's an issue.
And in that particular case we had large cracks in the elevated slab that told us that there were loss of strength on this structure. So let's talk about the end anchors, some of the potential signs you might see on your structure. This is a parking structure and you can see the grout pockets that Tim was talking about. So after construction, if you start seeing this staining efflorescence on the side, that might be an indication that moisture is entering. It's not always the case, but that is one of the signs. You may also, this is more advanced. You can also see dark grease staining where actually the grease from the tendons is pushing out the ends.
You can maybe see even minor corrosion staining. This is a project that worked on, we saw some minor staining. We knew it was post-tensioning. We kind of did some exploratory work and actually found there was significant corrosion of the tendons. And you can see here it's not a significant crack or even significant staining. Also, some of the signs you might see is this, if you have a crack with a red arrow, there is and you actually see this grease staining and it's more of a clear type stain versus when you think of car oil leaching through a crack, potentially it's a darker black stain instead of this that might tell you that this is actually post-tensioning grease leaking out of the sheathing.
And also you may see missing grout at the end. So that's obviously an obvious sign and not just that it exposes the end of the tendon if it's a non-encapsulated system to moisture, which is not ideal. So what's the significance? Ignoring it basically means you can get more moisture ingress that leads to corrosion and then eventually to broken tendons and loss of structural capacity. So let's just look at some of the issues that could be introduced during construction. So at the end anchors, we talked about the grout pockets. There's a few things that could happen and some of that is poor consolidation, poor quality grouting. You can see that there.
You can also have missing grease end caps or misplaced end caps, that's this photograph right here and that would be true for encapsulated system if it's an older system, you would not have these end caps. With this newer systems or relatively newer systems, the encapsulated systems, one of the things you look for, and we see it a lot unfortunately, is that the tendon tails have not been cut to proper length. And what that results in is that the grease, the end cap basically has a certain play and it has to be cut to about half an inch to three-quarter inch to allow it to get seated properly. And if it's not, then you don't get a proper seal. The project there at the bottom, actually it was readily invisible that there were issues with the tendon tails not having been cut short because the black little tips there you see on the edge is actually the end of the grease cap and that shouldn't be showing up like that. They should actually be covered by grout.
In older systems, as I mentioned, you won't even have the end caps. And for this project, for example, this was a cavity wall system, there was no waterproofing and actually mortar droppings were collecting around a directing water that was running down the back of the brick into the grout pockets that were not grouted either and just basically corroded at the ends. So leaving these deficiencies at the end anchors basically introduces vulnerabilities that result in moisture ingress and corrosion. So what are some steps we would take if we see some of these conditions, these exterior signs, these superficial conditions, I guess? Well part of it would be doing exploratory openings, evaluating the conditions of the tendons and anchors. For instance here we removed the end cap. This was in a before shot. You can see the cap, it's white. Usually that grease in that end cap should be like an amber color.
You can see the water actually, a moisture coming out of the end of the strand. So you know moisture has entered and it's been going on for some time. And some of the resolutions, depending on the conditions, obviously there's some other things as far as the wedges and things like that here that need to be addressed. But afterwards what we would do is to remediate some of these issues potentially is sandblasting the surface. You can see that top right picture, you can see clean that end is and we cut the tail off to allow the proper seating of a new end cap and then obviously patching it properly and maybe if it's like a below grade or ED grade condition, you might want to waterproof the patch.
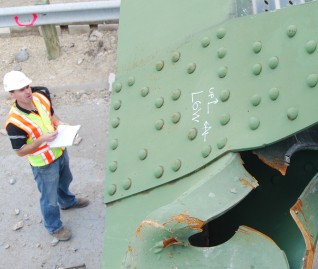
I did mention blowouts earlier, so that's a more of an explosive event that hopefully it won't get to that point. But just to make the point of what could happen is here's a picture of before, this is another parking deck and this is not exclusive to parking decks, but this is just an image that I had from a project. We had mentioned to the zoner that we'd seen these cracks in the anchorage zone. We knew it was post tension and you can see the bottom image there, the red arrows, the cracks and it didn't get addressed. And then we got a call later, a couple of years later actually, and this was the after and this was actually a blowout at the end. The anchorage was all pulled out and we ended up having to repair this, splice it and patch it and whatnot.
And some of the contributing factors to blowouts as well can be basically just during the original construction, the misplacement of the U-bars or bursting reinforcing, which I'm showing in that image, the top one being the wrong way to do it and the bottom basically showing how you're supposed to put those hairpins a little bit back to confine that area so that it can handle these bursting stresses. Older systems potentially don't have the bursting steel and also in newer systems you wouldn't be putting bursting steel, necessarily these hairpins anywhere. U-bars and uniform tendencies typically would be in banded tendon directions only.
So to remediate it, basically you would want to rebuild those areas and obviously put the correct reinforcing in there and at that point too, you might want to look further and just look and see if there are issues in other places. Here I want to just talk about the tendon misalignment that Tim alluded to earlier as far as the drape and it being potentially an issue or reinforcing. In this particular case, this is the podium slab that was actually a blowout at the bottom of the step and this is pretty common construction these days for podium construction. You can see the image on the bottom, the detail with the green tendons and there was some issues with the reinforcing placement in the field and the detailing that resulted in a blowout 'cause you've got these high forces as downward force that I was demonstrating with the animation.
Also you can have reversal of curvature. This can happen if the post tensioning tendons, the bundles aren't tied off properly and they can float up as they place the concrete. So we call that the drape, the vertical alignment and that can create downward forces that can create other problems, cracking and such reduce the load capacity potentially. You can also have insufficient clear cover. There's some images, the top one basically being that the tendons are too close to the bottom, they just put some patches on the underside to cover them to get enough clear cover. And then on the bottom image this is just they're exposed to traffic in this case and actually damaging the sheathing and water can just run right in and they'll run to the low point, collect there and start put the corrosion process that we talked about potentially.
Excessive sweep is kind of similar to reverse curvature, what I mentioned earlier. It just is a horizontal misalignment, sweep horizontally as I'm showing here. And again the forces, it'll eventually, I've had projects where this is detected later, years later sometimes, where it'll blow out and without notice basically. And so it won't happen immediately even during stressing.
And again, as I mentioned as far as the alignment potential issues is spalls, cracking. You'll see like this here, you'll see the cracking reduced load capacity and really at this point need to investigate things further as far as maybe there are some other issues, this might alert you to some construction issues.
And then barrier cables, we briefly mentioned, but they're certainly there for life safety as far as railings or car impact. And this was a project where actually the anchorage point, the concrete element there, if you want to call it a post or a wall, actually started dislodging or moving, displacing because of the post tensioning pool force pulling this to the right and then basically yielding the bars. And so these could be potential design issues that you could be facing, could also be related to construction potentially, but also you can run into issues with deterioration as far as corrosion in this case of barrier cable because it is exposed.
Older systems sometimes actually had sheathing around it and trapped water. Nowadays, you really want to see galvanized strand, you don't want the surface applied galvanizing material that can deteriorate quickly. But anyway, there are lots of different issues with barrier cables as well. And then being obviously a life safety type thing, restraining cars from going over the edge potentially. They're critical to maintain and to be properly stressed. So here you can see too, sometimes there's damage where cars are just bumping into these and failing these anchorages and so that covers my area. Pass it on to Tracy.
TRACY NASSAU
Thanks Ralf, really appreciate that. So moving on to this next section. We've been talking a lot about big picture, what happens as the result of construction, we will say choices or episodes or even some design decisions. So I'm going to take a few minutes and talk about moving on in the life of a structure, what happens with regards to maintenance or lack of, and then we'll get into some things that may emerge a little bit later in its life.
So the first thing is we may get the moisture situation under control whenever we first construct a building, but over time it's really critical to watch for keeping moisture out in its entirety. So this photo on the right, you can see an expansion joint, really common in parking structures where the joint seal has kind of fallen out. This is critical because there are tendon and anchors right at this joint.
So if that concrete gets saturated or if there's any cracking, you could actually have a really efficient way for the moisture to potentially access your tendon. This is more vulnerable for systems that are not encapsulated. In this parking structures that was pretty common before the nineties. It started rolling into practice around 2000 but really wasn't really common until 2010. So it took a while for that system to really take hold. Just from perspective because I've seen a couple of questions come through, in building systems it's actually was not required until the local building code adopted the 2014 ACI. So it's really recent. So when we get to balconies in a second that'll come into play. But coming back to this, that photo on the left, this is another example of some joints where somebody decided to grow green space where there wasn't really ever one to be intended. So another really easy way for water to get into the structure and into the system and potentially get into that post-tensioning.
So I set it up for balconies. Balcony edges are a spot that are particularly vulnerable, partly because buildings weren't required to have encapsulated systems for quite some time and as a result you can get these extreme exposures that may not have all the protections that are available. So this particular one where you see the cracking, it's actually an oceanfront property, so it's a very aggressive environment.
The waterproofing system provided by the tile is incomplete, so the tile itself may keep the water out but the grout joints in between can let it through. And in this situation we were seeing evidence of this exact mechanism because we're seeing blistering coating. So that was a bit of a red flag. Eventually that water intrusion will lead to corrosion of any corrodical steel of area. So you can see in that lower photo there's conventional steel. When we were up close, you could see each corrosion of the rebar that's actually on the bearing side of those anchors. And then here you can see corrosion of the anchors and the tendons themselves right at that edge. The other complicating factor is the handrail posts land right at those anchors. So when those posts are unsealed, it's a very nice path again for water to get in there. So protection of these is a often overlooked feature.
Concrete deterioration is also a very common incident that can compromise the post-tensioning system. This is something to keep an eye out for. Just like Ralf said earlier, whenever you have tendons near the surface, it can be vulnerable to physical damage and then moisture intrusion. So you can see it here. There's an old repair with some asphalt in it, but you can also see where the tendons were a little bit shallow. They were probably initially covered with concrete, but over time that has changed and the result, at least in this garage was actually full fracture of those tendons. So you have to keep an eye out for this. This is one of the situations where early investigation and intervention can actually really benefit from getting to a point where you have to worry about structural capacity loss. But also the sooner that these conditions get addressed, the less extensive and usually less money-wise, painful, it can be.
Tendon eruptions. This was mentioned earlier. These are definite signs that the tendon has lost force. The top photo shows where one is poking out of its end anchor on a building facade, the lower one is actually an eruption coming out the bottom side of a slab ceiling. Typically, whenever this lets loose, when you get a break, there's just a large release of energy. We talked about that 27,000, 30,000 pounds in each of those seven wire strands and where there's low concrete cover it low points between columns or high points over columns or beams or at an in anchor, that's where they tend to come out. So this is a condition that definitely requires investigation to find out if there's other similar conditions that have not erupted. So we might be dealing with a significant loss of structural capacity or if it's a one-off incident.
A little more subtle is cracking and movement within particularly slabs and beams. It is really important to recognize that concrete cracks, so any kind of reinforced concrete, whether it's post-tensioned or not, it doesn't even realize that there's steel in there until the concrete cracks and then it'll engage that steel as its tensile reinforcement. The difference with the post-tensioned structures is that because of that initial level of pre-compression. We don't expect to see wide cracks and we especially don't expect to see vertical movement across cracks. So those really indicate that something is off. There's some sort of behavior that the load is not going through that element like it was supposed to be.
And in the most worrisome cases it could be that we've lost post-tensioning force, in which case that has structural implications. It could be that tendons are broken, there could be some sort of deterioration compromising it, and that's an immediate concern that would need to be addressed quickly. Sometimes it's just bad behavior. Tim then talked at the very beginning about how columns and walls and these restraints need to be detailed to accommodate that initial shrinking whenever the concrete's initially squeezed by the pre-compression force by the tendons.
So whenever we start seeing 16th to eighth inch cracks, that's a red flag that pre compression is not getting all the way through and it just needs additional investigation to find out if it is indeed significant or not. Similarly, we can watch the gravity-bearing elements, so columns and less often walls, but if we start seeing cracks like the ones that you're seeing in these photos, it's telling us that we may have unintended loads being imposed on the columns and the columns have not been designed for. And then worst case, we either are having section loss like that photo on the left where there's a big chunk just missing or it just may be unintended lateral loads on a gravity-bearing element. So all of this could potentially compromise the capacity of the column itself. So this is something that deserves some extra attention.
In all of these the repeated theme is yes, there's something going on. It's recommended to get a structural engineer involved who has experience specifically in evaluating post-instruction structures so that they can come in and actually evaluate it and help define the extent and most importantly determine if it's a structural concern. It may be a problem, it may not be a problem, you just don't know until you can get in and have an opportunity to take a closer look at it. And then if it turns out that's not a problem, an equally important question could be, if it's fine now, will it be a problem later? Because the other recurring theme is protection from moisture. So if we're leaving something vulnerable, we need to be thinking ahead of is there something that needs to be done now to be a good steward and take this asset all the way through to the end of its intended service life.
So this investigation just give you guys an idea of what this might look like. Usually starts with a document review. Structural engineers like to look at structural drawings, they like to look at shop drawings. So note to anybody who happens to be involved early on in the life of a post-instruction structure. If you run across or have those shop drawings that get submitted as part of the submittal process, hang onto that. That may save a lot of pain and future expenditure later on in the life, like years down the line.
The next is simply visually looking at what's going on. Sometimes this is supplemented with a chain drag or a delamination survey, but just evaluating what's happening. Unique to this type of investigation is inspection openings. So Ralf mentioned earlier, making inspection openings to find out different conditions that are happening at the end anchors. A lot of engineers will do this on the interior as well. And this allows us to directly assess the condition of the tendon. Is there moisture already in the sheathing? Is there corrosion happening? Because both of those things will influence next steps.
We can even evaluate what's the current tension level on the tendon. If there's already a known break, so we've got one of those eruptions, the tendon may actually be extracted and that'll allow the engineer to lay out the location and then they can see what may have caused it. So it's a valuable source of information. Similarly, you can actually look at the fracture surface and sometimes there's even a material problem that may have cropped up. So the fracture service can actually give you a lot of valuable information that'll influence what happens next. Non-destructive testing is often involved. This ground penetrating radar or GPR is one of the most common ways to do this right now.
It actually helps define where the tendon is without making openings. It allows you to find the profile. So where is it up? Is it down? Is the tendon not located where we're expecting it to? It also allows us to take a look at the quantity and locations of conventional reinforcing steel, which can have a heavy influence on how these structures behave. A lot of that typically leads to analysis, especially if we have a situation where we're seeing unexpected cracking that allows us to make a determination of how's it doing? Do we have a structural issue that we need to be alarmed about? And finally, the most important part is all of this information allows the engineer to develop recommendations for the specific conditions. These are definitely not one size fits all situations.
So we've been a little bit doom and gloom and a lot of times post-tension structures actually perform great. They're usually very durable when you end up as intended with a relatively crack-free or very little cracking situation. They last a really long time and they'll last long enough that people start thinking about doing things to them. So I wanted to walk through a few situations just to give a heads-up to people who may be involved in this.
The first thing or the most common thing that comes up is making some sort of opening, whether that's ADA modifications as you've got a building built in the seventies or eighties that needs to be upgraded for modern usage. A lot of times you run into railing posts, which I'll get to in a little more detail in a second. But also just plumbing, electrical, all of these penetrations. There's lots and lots and lots of reasons for cutting and coring.
So what we often see, somebody will be, for instance, like in the photo on the left, coming in to move a toilet so that they can upgrade their bathroom and they core through the slab, think everything's hunky-dory, fill a pop, look around and you end up with something on the right where suddenly you've got tendons sticking out into the stairwell, which was not obviously supposed to be happening. And what happened here is they just cored right through three tendons and unfortunately this was a very expensive core hole because they had to go back and obviously repair this. So the advice here is just be aware. Before doing anything in the slab, go through and locate the tendons. There's lots of tools at our disposal to do this. It's a very small cost in the scheme of the project most of the time, but definitely compared to having to come back and repair.
One of the things that catches people off guard is actually fasteners. You don't think much about putting a screw in a floor or a ceiling. This particular photo is actually a project that we were involved in where the contractor and the owner were replacing a window system. It seemed straightforward. Well, they were installing fasteners for the sill, again, heard something pop and vibrate a little bit and looked closer. And it turned out that once they removed the sill, they found this ball. They could see the tendon in this slab where it's boxed in blue there, and then a couple of faster holes where they had absolutely just nailed it.
So the downside of this was obviously they broke a tendon, but we've also had stories where there have been very expensive window treatments where people are fastening to the ceiling, thinking that they're doing everything right and then can cause a significant amount of damage to the structure completely unintentionally. The problem is at high points and low points, you may only have half an inch to three quarters of a clear cover over those tendons, especially on interiors. So it's something that to be very aware of. We actually have a lot of building owners that we've spoken with that just prohibit tenant drilling anything into the structure and have to defer that to a contractor or building maintenance.
And then I promised a little bit about hand drills. The tricky thing with handrails, like we said earlier, they go with the edges of slabs and you guys are probably caught on by now, guess where those end anchors are? So in this particular instance, they didn't quite go all the way through the end anchor, but they definitely chopped off the end of one and ate into the adjacent one. So this is probably a near miss for losing that tendon. But because these elements occur in the same area, you really have to watch to make sure that we are planning ahead and locating the tendons and making sure that we're avoiding those conflicts.
So a fun thing from an engineer, which can be an interesting to hear is major openings. So this has actually come up more and more as we're starting to really upgrade our existing inventory for office buildings. It's also become a popular topic as we're talking about converting office buildings to residential because we want more light, we want atriums, we want light wells, we need new stairs, we need elevators for access. There's all kinds of reasons for making major openings. So this one in particular, we were asked by the client to take a look at creating an opening in a slab about a hundred square feet. So it doesn't seem all that big, but the complication is we were going to be interrupting about 17 tendons across five bundles. So the thing that the owner wasn't realizing and that we were having a conversation about very quickly was exactly what happens when you cut through these tendons.
So anytime we interrupt it, they can be re-anchored. It's just a lot of work. So you have to make an opening. You may or may not have to lock it off, you may or may not have to have a shoring. There's a lot of structural considerations that way, but then you also have to just simply re-anchor it and restress it, which involves making a smaller opening adjacent to your bigger opening, resetting, splaying, resetting. There's a lot of stuff. So the implication is it can be done, but it is a significant cost impact that not everybody always foresees whenever the architect draws a nice box on the floor.
So the advice on this is pretty straightforward. One of the things that we found that works very well is trying to collaborate early. Usually nobody wants to talk to their structural engineer, but I promise we're not all super boring. We can actually give some suggestions and feedback, especially early on before plans are finalized to make this a little more efficient. And this scenario, this happened to be mechanical shopped. They were able to modify the size of it, so we only impacted 12 tendons instead of 17. So it was a significant benefit to the project and the project schedule.
Another item that sometimes gets overlooked is just moisture protection. I mentioned these light wells on atriums. Whenever we take indoor spaces and make them into outdoor spaces, we really have to be cognizant not only of leakage into the floors below, but to protect the tendon system long-term because we're changing that exposure and it's paying attention to making sure we're sealing joints and cracks and getting good use out of waterproofing membranes and traffic coatings.
One big place that this is often, I think most often, overlooked is whenever interior floors are converted to parking. Because initially all of those areas are protected by the building envelope. And then now we may have cars coming in definitely bringing water and in many parts the country we're also dropping in chlorides. So it can really become a corrosion mechanism very quickly, especially when we have a system that's not initially encapsulated. So there's special areas, keep an eye out the end anchors, any joints, especially expansion joints.
So that brings us to the end of most of our content. Basically in summary, I mean, hopefully some of the big takeaways, it's really important to recognize in post-tension structures that tendons are the primary source of that load-carrying capacity. And if you damage the tendons, you're reducing the structural capacity of that element, sometimes significantly, and you commonly see them in beam slabs and some special walls or columns and the barrier cables.
The durability of those systems can be impacted by things that happen early in its life that may not show up for several years. So it can happen. It is a small risk, but it's there and if it occurs it can be dealt with. There's a few unexpected things. So hopefully you all saw some of those examples of red flags. Cracks may be innocuous, but they large cracks really shouldn't be expected in a post-tensioning structure. And it's worth making a call, having that taken a look at by a specialized structural engineer.
And finally, some pointers and modifications as we keep moving forward and we have more post-tension inventory, that's going to become a bigger topic of conversation as we're continuing to reuse and sustain our built environment. So with that, I want to thank everybody for your attention and we will be glad to answer as many questions as we can.
LIZ PIMPER
Thank you, Tracy. All right, our first question, does the entire strain have to be replaced if moisture is present?
RALF LEISTIKOW
This is Ralf. It really depends, and that's when an assessment becomes important. It just depends on where the failure or the corrosion has occurred and if you can figure that out, you can do partial repairs or full-length repairs.
LIZ PIMPER
Is there a predictable timeline for some of these indications?
RALF LEISTIKOW
And as far as corrosion, I assume that's what we're talking about and it isn't. It's dependent on environment and the variables we explained as far as construction. I mean some of these, the moisture, if it's introduced at the time of construction, again, it could potentially happen much earlier than expected. It just really depends on the type of system, the construction, and there's lots of different factors. So the key is really to figure those things out based on the information that's available about the building and the construction and such.
LIZ PIMPER
So we have a couple of questions related to what you mean when you refer to older PT systems or newer PT systems, what's the date range we're looking at and when did encapsulated cables become standard?
TRACY NASSAU
Yeah, I'll jump in and grab that one. I started to touch on it 'cause I saw the question come through, so hopefully we didn't leave everybody wondering too long, but it's an excellent question. There's a couple of different types of systems that we have a whole different presentation on that we will find for you, but it boils down to we started moving into plastic sheathing, which was a big step in the mid to late sixties moving into the seventies. And then anything post, maybe mid-seventies. I know I've never seen non-plastic sheathing beyond that. I can let Ralf jump in if he has an anecdote. The encapsulation, there was some really early versions, starting in the late seventies, early eighties where you might start seeing caps on uncoated anchors. But the encapsulation system that we showed at the beginning where it's fully watertight beginning to end kind of came on the market in the early to mid-eighties.
It started being encouraged about that time in, they call it "aggressive environments." So mostly parking structures. I would say it wasn't adopted in parking structures, it's probably until around 2000, maybe the 2010s as different codes started to pick it up as a requirement rather than a recommendation. And then one of the most impactful ones on buildings is that is much more recent as a requirement. So the systems were available around those same times, but it wasn't a requirement until ACI 318 2014. So PTI, the Post-Tensioning Institute made a pretty strong statement around 2010, 2011. But it's taken a while for that to get through the building requirements. So where that mostly gets impacted is those interior spaces that we were talking about for conversions, but really balconies. It was balconies that were triggering a more forceful stance in the industry on it.
TIM GREGOR
And I wanted to pipe in there too. Slab on ground applications are still not required to be encapsulated.
TRACY NASSAU
Yep. Thank you Tim. That's important.
RALF LEISTIKOW
Yeah, and I'll chime in as well. If you wanted a more complete history, feel free to reach out to me. There was actually a paper I wrote that has a whole history of the systems and such, so if you wanted to learn more about it and what we can cover here, I'd be glad to provide that to you.
LIZ PIMPER
All right. What does the repair process look like when there's end anchor blowout, aside from the end spalling and cracking? The strand has lost its dressing. So how do you remedy the loss of strength in the remainder of the span?
RALF LEISTIKOW
I guess I'll jump in. It really depends, as Tim mentioned, if it's a uniform tendon where you just have a couple of cables or if it's actually at a location where it's banded. Banded always described to people as the girders, the main load carrying members because it contains lots of tendons. So if you have a blowout in a banded direction, the repairs usually get more complicated because you potentially, as Tim mentioned, is there damage on one end of a tendon that impacts the entire structure or the entire length of that tendon is compromised at that point.
So if you're talking about a main banded direction, you potentially need to do shoring, you may have to lock off anchors tank temporarily. You get into spreading out tendons, potentially it becomes pretty complicated. Uniform tendons, it's more doable and you just have to find locations to lock off, basically add an intermediate temporary anchor and then repair the area. Basically detention the area where the blowout is. There may still be some tension cable, so you've got to really be careful. I would recommend you contact qualified contractor and engineer to help you with that, but it does become complicated if you get into banded tendons.
LIZ PIMPER
All right, our next question is, are green roofs not a good idea for post-tension structures?
TIM GREGOR
I'll jump in on that one. So that may have been a little bit of a joke calling that a green roof structure, but as we mentioned in some of the slides, the fully encapsulated systems have a little edge on durability compared to conventionally reinforced structures. So green roof structures are not an inherently bad option for a PT system. We would probably recommend some sort of moisture barrier between the green roofing, but that would probably be a standard practice for any type of landscaping or green roof to mitigate the damage that moisture from that green system could cause to the structure. It may be more of a concern for older structures.
RALF LEISTIKOW
Just to add on that, I've worked on a couple plaza projects with post-tensioning, similar to the post-tensioning, waterproofing systems have evolved quite a bit too. And so you get into older waterproofing systems and they're just not that durable. So even newer systems, they have a finite life. So the critical part is the waterproofing system, regardless if it's a post-tension system or conventionally reinforced system. Moisture obviously is going to drive corrosion in both. So yeah, there are different things to keep in mind if you have a green roof. Waterproofing is obviously a critical part.
They're going to be continued to be designed by architects I'm sure, but it's just picking a good waterproofing and making sure you inspect your structure. I think that was one of the questions. How often should you do it? It again, depends on how old the building is and the type potentially a post tensioning system you have. Certainly if it's some of the older systems that predate the encapsulated systems, I would say inspect it more frequently. It depends, if you haven't done it yet, you should go ahead and do it. And then based on the conditions observed, you can basically get a qualified person to tell you what should be the regularity. If there's not much going on, maybe you do it every five years. If you start seeing issues, you might want to do it every other year or every year.
LIZ PIMPER
Okay. Next question. What is the percentage of slab capacity lost? If all the tendons break, how much reserve is in the slab and reinforcing without the post-tensioning?
RALF LEISTIKOW
I guess I'll jump in. It really depends on the design, honestly. That's the thing. That's where really the post-tensioning shop drawings become critical is understanding how many post-tensioning cables are in that area. And you can lose some sometimes, but it just really depends what the original design. I mean there is not necessarily significant additional post-tensioning force. Obviously engineers design with safety factors and such. But again, you don't want to ignore signs that there are issues with potential post-tensioning tendon failures. You do want to get a qualified person to look at it and review it for you and tell you whether it's okay or not. So it's really a case-by-case basis.
TIM GREGOR
And adding on to that, if you've lost all of them, that's probably a big red flag. And as Tracy mentioned, the cracks and if you were to see displacements in some of the structural elements like the beams or the slabs, that would also be another red flag that you should be very concerned.
LIZ PIMPER
All right, we've got time for one more question. The big picture advantage of PT systems is that you can have longer spans. Are there any other benefits as to why a client or a team would select the system versus more typical steel and concrete? Are there carbon benefits, less steel or concrete?
TIM GREGOR
You can reduce the slab thicknesses with PT, so you've got more clearance between floors or you could put in more floors in your building for the same height overall. You also get the benefit of if it's an exposed building like a parking garage with the fully encapsulated system, you've got durability benefits that you can take advantage of.
LIZ PIMPER
Any carbon benefits?
TIM GREGOR
Would probably most likely reduce the amount of mild steel you would need in there as well as just overall steel. So if that is something that gets you a carbon benefit, then yes.
TRACY NASSAU
Oh Tim, and concrete. Concrete's a bigger issue, I believe, than steel. Yeah,
TIM GREGOR
So if you get a reduced slab thickness, then you're using a significantly amount less of concrete.
LIZ PIMPER
All right. Okay. Well thanks Tim and thanks Ralf and Tracy. That was a great presentation and thank you all for joining us. We hope it's been educational. So again, thank you so much for your time and we hope you have a great rest of the day.
RELATED INFORMATION
-
 Timothy A. Gregor, Senior AssociateWJE Chicago MORE >People | Timothy A. Gregor, Senior Associate
 -
 Ralf Leistikow, PrincipalWJE Raleigh MORE >People | Ralf Leistikow, Principal
 -
 Tracy Naso, Principal and Unit ManagerWJE Chicago MORE >People | Tracy Naso, Principal and Unit Manager
 -
 When the integrity or condition of a structure is in question, clients rely on us for answers MORE >Services | Structural Engineering